Co2 Monitor: Unterschied zwischen den Versionen
Die Seite wurde neu angelegt: „{{Infobox Projekt |name = CO²Monitor |status = stable |autor = schinken |beschreibung = IoT CO² Sensor…“ |
Keine Bearbeitungszusammenfassung |
||
| Zeile 1: | Zeile 1: | ||
{{Infobox Projekt | {{Infobox Projekt | ||
|name = | |name = CO² Monitor | ||
|status = stable | |status = stable | ||
|autor = [[Benutzer:schinken|schinken]] | |autor = [[Benutzer:schinken|schinken]] | ||
Version vom 4. November 2017, 17:26 Uhr
Status: stable | |
|---|---|

| |
| Beschreibung | IoT CO² Sensor |
| Autor: | schinken |
| PayPal | |
Description
Someday a TFA Dostmann CO2-Sensor AirCO2ntrol appeared in our hackerspace - but the CO² reading couldn't be easily acquired through USB or any other connector. There are some implementations using python or nodejs, but they require a raspberry pi or at least a PC nearby to read the values to publish and store them somewhere.
Because nowadays ESP8266, NodeMCU or in our case a Wemos D1 mini (which also has a ESP8266 on it) exist and is totally suitable for the job! Sadly, on the TFA Dostmann there's only a USB interface on the outside, and our Microcontroller does not support USB natively. So we opened the sensor and found a "CALIB" interface
Hardware
Inside the TDA Dostmann CO² sensor, there's a CALIB interface, which consist of four PINs. GND and 5V can easily be determined using a multimeter with continuity test. These PINs are directly connected to the USB port and can be used to power our microcontroller. The other 2 PINs in the middle seem to send some data. After connecting them to a oscilloscope one PIN was obviously just clock, and the other data.
-
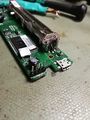 LTR: GND, Clock, Data and 5V
 -
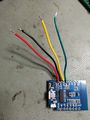 Add wires
 -
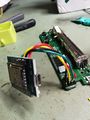 Connected!


Software
The signals look like they're just I2C, but actually they're not. Using the scope to decode the data failed - the same is true using the Wemos. After wiring up the sensor to the Wemos we used an external interrupt on the clock pin and a digitalRead on the data pin which is basically "bit banging".
The results were promising: Using a simple python script and the documentation from another manufacturer, we were able to verify the checksum. Also implementing the decode of the data was quite simple using the PDF:
case 0x50:
 co2Measurement = (data[IDX_MSB] << 8) | data[IDX_LSB];
 break;
case 0x42:
 temperature = ((data[IDX_MSB] << 8) | data[IDX_LSB]) / 16.0 - 273.15;
 break;
The last thing to do was connecting to wifi and publishing the data on MQTT.